Have you ever bought a car from a dealership and noticed that they put a sticker on your car with their name and logo? If you are like many car owners, you might not be happy with this sticker and want to remove it. After all, why should you advertise for the dealer for free? Moreover, the sticker might ruin the look of your car, especially if it does not match the color or style of your car. And worst of all, the sticker might damage the paint of your car if you leave it on for too long.
If you want to remove the dealer sticker from your car, you might think that it is a simple and easy task. However, you should be careful and follow some steps to avoid damaging your car or leaving behind any residue. In this article, we will show you how to remove dealer sticker from car in five easy steps. By following these steps, you will be able to remove the sticker safely and effectively, and make your car look as good as new.
Step 1: Gather the necessary tools and materials
Before you start removing the sticker, you need to gather some tools and materials that will help you with the process. Here is a list of what you will need:
- A hair dryer: This will help you heat up the sticker and loosen the adhesive.
- A plastic card: This will help you peel off the sticker without scratching the car surface. You can use any plastic card, such as a credit card, a gift card, or a membership card.
- An adhesive remover: This will help you remove any residue left by the sticker. You can use any commercial adhesive remover, such as Goo Gone, WD-40, or rubbing alcohol. Make sure to read the label and follow the instructions on the product.
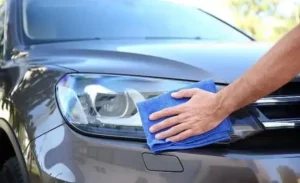
- A microfiber cloth: This will help you wipe off the residue and clean the car surface. You can use any soft and lint-free cloth, such as a towel, a rag, or a sponge.
- A wax or polish: This will help you polish the car surface and restore the shine. You can use any car wax or polish that is suitable for your car. Make sure to read the label and follow the instructions on the product.
When you use these tools and materials, make sure to be careful and avoid any contact with your eyes, skin, or clothing. Also, make sure to work in a well-ventilated area and away from any flames or sparks.
Step 2: Heat up the sticker with a hair dryer
The first step to remove the sticker is to heat it up with a hair dryer. This will make the sticker softer and easier to peel off. To do this, follow these steps:
- Plug in the hair dryer and turn it on to the highest setting.
- Hold the hair dryer about 6 inches away from the sticker and move it back and forth over the sticker. Do not hold the hair dryer too close or too long on one spot, as this might damage the sticker or the car surface.
- Heat up the sticker for about 2 minutes, or until you see the edges of the sticker start to curl up.
Step 3: Peel off the sticker with a plastic card
The next step is to peel off the sticker with a plastic card. This will help you remove the sticker without scratching the car surface. To do this, follow these steps:
- Insert the plastic card under the edge of the sticker and slide it along the sticker. Do not use any sharp or metal objects, such as a knife, a razor blade, or a screwdriver, as these might scratch the car surface.
- Peel off the sticker slowly and gently, using the plastic card as a lever. Do not pull or yank the sticker, as this might tear the sticker or leave behind some glue or paper.
- Peel off the sticker from one corner to the opposite corner, or from the center to the sides, depending on the shape and size of the sticker. Try to peel off the sticker in one piece, if possible.
Step 4: Remove any residue with adhesive remover
The third step is to remove any residue left by the sticker with an adhesive remover. This will help you clean the car surface and prepare it for polishing. To do this, follow these steps:
- Apply a small amount of adhesive remover to the remaining glue or paper on the car surface. Do not use too much or too little, as this might affect the effectiveness of the product.
- Wait for a few minutes, or as long as the product instructions suggest, to let the adhesive remover work on the residue.
- Wipe off the residue with a microfiber cloth, using circular motions. Do not rub or scrub too hard, as this might damage the car surface.
- Repeat the process until all the residue is gone.
Step 5: Polish the car surface with a wax or polish
The final step is to polish the car surface with a wax or polish. This will help you restore the shine of the car surface and protect it from future damage. To do this, follow these steps:
- Apply a thin layer of wax or polish to the car surface where the sticker was removed. Do not use too much or too little, as this might affect the quality of the finish.
- Wait for a few minutes, or as long as the product instructions suggest, to let the wax or polish dry on the car surface.
- Buff the car surface with a microfiber cloth, using circular motions. Do not buff too hard or too fast, as this might create swirl marks or scratches on the car surface.
- Repeat the process until the car surface is shiny and smooth.
Conclusion
Congratulations! You have successfully removed the dealer sticker from your car. By following these five easy steps, you have improved the appearance of your car, avoided unwanted advertising, and prevented damage to the paint. You can now enjoy driving your car without any annoying stickers on it.
We hope you found this article helpful and informative. If you have any feedback, questions, or tips on how to remove dealer sticker from car, please feel free to leave a comment below. We would love to hear from you. Thank you for reading and happy driving!